Step 3: Upgrading Certification Manager to 10.2.8

Caution: 
The following scenarios will be supported for upgrade. However, switching from one scenario to the other is not supported; for example, SSL to non-SSL and vice versa.
  • SSL
  • Non-SSL
  • Default Website
  • Non Default Website

The upgrade wizard copies all the files and folders required for upgrade to your server and creates the upgrade framework folder Certification Manager Upgrade Framework on the path specified during Upgrade Framework installation. The Inventories folder containing all supported product inventory is also copied under at the specified Upgrade Framework install path.

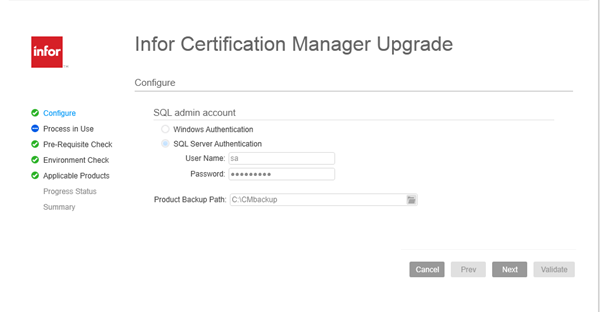
Perform the product upgrade as follows:

  1. Before proceeding with Upgrade Wizard, complete the following steps on Report Server:
    • Apply the patch as mentioned in the KB 2028222.
    • Complete these steps on the Report server:
      • Go to report server (user having Server Administrator rights) and stop the SQL Reporting Service.
      • Copy the file Approva.SSRS.ResourcesEx.dll, Infor.ReportHelper.dll and the Approva.ReportingServices.CSVWithoutReportFormatRendering.dll from [InstallPath]\Inventories\PlatformServices\Assembly\MSSSRS\RDLLocalization to the [MicrosoftSQL Server InstallPath]\Reporting Services\ReportServer\bin folder on the Reporting server.
      • Start the SQL Reporting Service.
      • Warm up the report server by accessing the reporting service from the browser http://REPORTSERVERNAME/ReportServer. This will help load all necessary infrastructure of reportserver and the upgrade will save some time during report publishing.

  2. To access the SQL database, the user must be either a Windows or a SQL user with the sysadmin role.
    • SQL Server authentication – if you are using the SQL authentication option, specify the user with sysadmin rights to access the SQL database server
    • Windows authentication – If you select this option, provide the User Name and password of the user with sysadmin rights on the SQL database server.
    Product backup path
    Provide a path to store the backup of existing version files and folders.
  3. Click Validate. The Process in Use screen is displayed.
  4. If Folder Content Index is marked as failed, configure the following settings:
    • Go to the Certification Manager folder located at the install path and right click Properties.
    • Click Attributes > Advanced.
    • Clear the Index this folder for faster searching option.
  5. Select Skip processes in use to ignore the warnings and continue with the upgrade.
    Note: If the antivirus cannot be disabled, the IRC folder must be omitted from the antivirus scanning or blocking process during upgrade. For details, contact the IT team.
  6. Click Next. The Pre-Requisite Check screen is displayed.

    This screen displays details such as the system requirements that are met for the 10.2.8 upgrade. The screen also lists the prerequisites for the installation, related version numbers and the status. If the version number of a prerequisite is incorrect, the status will be displayed as failed and the prerequisite must be installed manually.

    The installer checks for the following minimum prerequisites

    Prerequisite Minimum Check
    IIS (Internet Information Services) Version 7
    Microsoft .NET Framework Version 4.8
    Microsoft SQL Server 10.50.6000.34 for SQL Server 2008 R2 SP3
    Enable 32-Bit Applications (Application Pools) False

    If Enable 32-Bit Applications is set to True, the status on the Pre-requisites screen is displayed as Failed. In this case, follow the below steps to configure the status to False:

    1. Go to Start > Run and specify the command inetmgr to open IIS.
    2. Select Application Pools.
    3. Select DefaultAppPool.
    4. Click Advanced Settings.
    5. Set Enable 32-Bit Applications to False.
  7. Click Next. The Environment Check screen is displayed.
  8. Click Next. The Processes in Use screen is displayed.
    Environment Check Action (If fails)
    Set Anonymous Access Off
    1. Open IIS. Select Start > Run and specify the command inetmgr.
    2. In the Connections pane, expand the server name, expand Sites, and go to the level in the hierarchy pane that you want to configure, and then click the Web site or Web application.
    3. Scroll to the Security section in the Home pane, and then double-click Authentication
    4. In the Authentication pane, select Anonymous Authentication, and then click Disable in the Actions pane.
    Disable Proxy
    1. Open Internet Explorer
    2. Click the Tools button, and then click Internet Options.
    3. Click the Connections tab, and then click LAN settings. Deselect the Use a proxy server for your LAN check box.
    4. Go to the registry
    5. Expand the HKEY_CURRENT_USER by clicking on the + sign next to it. Continue expanding Software > Microsoft > Windows > Current Version, then click on the Internet Settings subkey or folder.
    6. View the contents of the Internet Settings folder on the right pane. Double-click on the Proxy Enable DWORD value to open the Edit DWORD Value window. Change Value data to 1 and press OK to confirm.
    Report Server Account Follow the prerequisite steps on Report Server (Step1).
  9. Click Next. The upgrade framework detects and displays the products already installed and the existing inventory. The Remark column will display these statuses:
    • Applicable - All the products marked as Applicable will be upgraded.
    • Installed - All the products marked as Installed have already been updated .
    • Not Applicable - All the products marked Not Applicable are not affected in this upgrade.
  10. Click Start. The Progress Status screen displays the progress of the upgrade.
    Note: If you encounter failure during the upgrade process, re-run the upgrade by double clicking UpgradeWizard.exe from [InstallPath]\BizRights Upgrade Framework.
  11. Click Show Details to view details of the progress of product upgrade in a new window.
  12. When the upgrade is complete, the Summary Screen is displayed.
  13. Click Finish to exit the wizard.
  14. Restart the machine after upgrade is complete.