Adding Infor CloudSuite to Azure AD
- Log on to the Azure Portal as a global administrator.
- Click , then .
- Click + New Application.
- Search for Infor CloudSuite in the Application Gallery.
- Select . Specify a Name in Infor CloudSuite <ENV> (PRD, TST, TRN, and so on) and click Create.
- From the Application Home, select . Select SAML as the sign-on method.
- Click Upload metadata file, select the ServiceProviderSAMLMetadata_MM_DD_YYYY.xml file downloaded from previous steps. Click Add.
- Click Save under Basic SAML Configuration. Click the X icon to close the section.
- Click No, I’ll test later on the test single sign-on message.
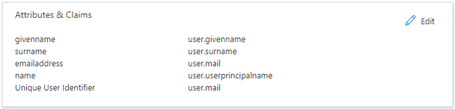
- Navigate to and click Edit. Ensure that the Unique User Identifier (Name ID) under is mapped to the Email address claim. If required, modify the claim by clicking the claim and selecting the Email address claim from the available . Click Save. Click the X icon to close the section.
- Navigate to . Click the Federation Metadata XML download link to download the metadata file required to configure Infor CloudSuite.
- Optionally, edit the section and change the Signing Option to . Click Save. Click the X icon to close the section.
- Select . Assign all users and groups that require access to Infor CloudSuite. Save any changes.