Generating metadata for BOD document
If you use the automatic transformation, you can generate the metadata for the BOD document. You can do this for both the document to be received and the document to be sent:
-
After completing the configuration in the connection point, you
can run a test.
- Click .
- Specify or paste an example BOD.
- Click . The specified transformation is done and the web service operation is invoked. For the output, the specified transformation is done. In case of exceptions, you are informed. If the action was successful, the resulting BODs are shown in a window. If the web service operation is expected to run any changes on the database, you can verify whether the data is as expected.
The web service connection point can be used in a document flow. Select the connection point in the web service activity and select the procedure to be used. Select the document that is used to trigger the web service call. The resulting document is automatically set in the document flow.
In this scenario, you can only use one document as input for the web service activity, and one document as output.
Complete the flow. For example by adding an activity that publishes the required document, an activity that receives the resulting document and mapping activities if required. After completing, activate the flow.
When the document flow is active, this happens:
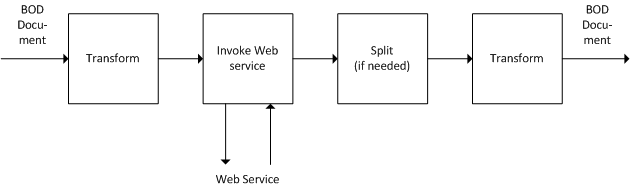
The incoming BOD document is transformed to the input as required for the web service operation. Then the web service is invoked using this input. If the process is successful, the output is used for the next steps. If required, the result is split into multiple items. Then the result is transformed to a BOD document (or multiple BOD documents, if splitting was done).
If ION cannot connect to the server it automatically retries. A Confirm BOD is generated for the incoming document, when:
- The server is available, and web service is unavailable.
- The web service returns a fault or another exception occurs.
To check this, select .
Example
If the incoming BOD is a
SyncMyCustomer, a user-defined transformation retrieves the customer ID from the BOD. This ID is used as input for the web service. The web service retrieves the orders for the customer. The result is split, because one BOD per order is required. Then the automatic transformation is used to create theSyncMyOrderBODs to be published.Example of an advanced (user-defined) transformation for an RPC-style web service:
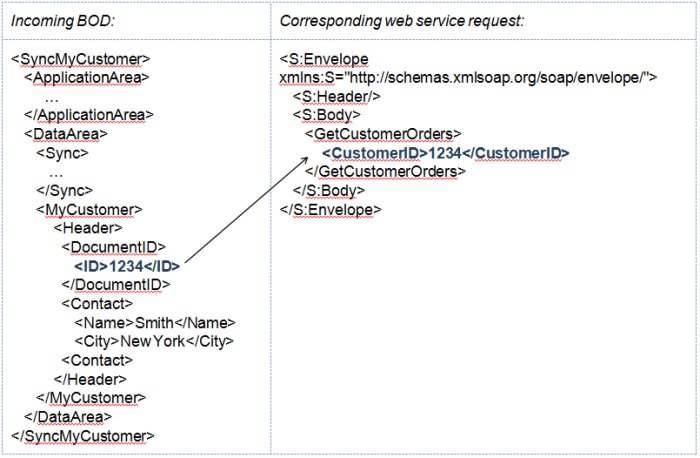 Note: the XSLT has the BOD
DataAreaXML as input and the complete SOAP envelope XML as output. You can use this XSLT:<?xml version="1.0" encoding="UTF-8"?> <xsl:stylesheet version="2.0" xmlns:xsl="http://www.w3.org/1999/XSL/Transform"> <xsl:output method="xml" version="1.0" encoding="UTF-8" indent="yes"/> <!-- change indent to "no" after testing --> <xsl:template match="DataArea"> <S:Envelope xmlns:S="http://schemas.xmlsoap.org/soap/envelope/"> <S:Header/> <S:Body> <GetCustomerOrders> <Customer> <CustomerID><xsl:value-of select="MyCustomer/Header/DocumentID/ID"/></CustomerID> </Customer> </GetCustomerOrders> </S:Body> </S:Envelope> </xsl:template> </xsl:stylesheet>The web service response is split and transformed automatically into BODs:
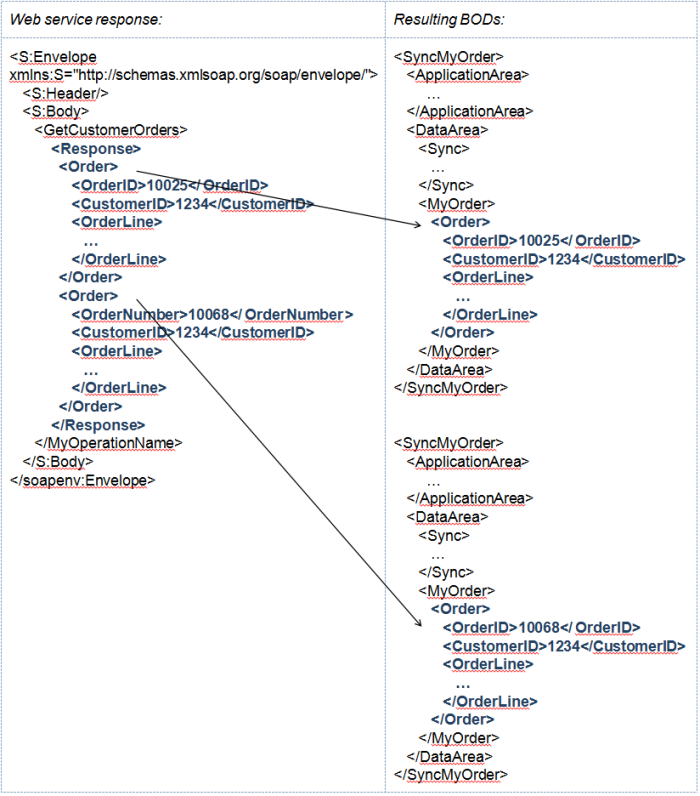 Note: when using the Advanced transformation, the XSLT has the complete SOAP envelope XML as input and the BOD
DataAreaXML as output. When using the advanced transformation in combination with splitting, the XSLT has the split element (and its children) as input.