Filtering InContext widgets using business context

You can use business context mappings and context message rules to control the display of InContext widgets. An InContext widget is displayed only when the configured rule matches the current business context or screen.

  1. Click the Insights option. The insights panel is displayed.
  2. Click Add. The Add Insight Group window is displayed.
  3. Specify the insight group.
  4. Click OK.
  5. Click the ellipses.
  6. Click the Edit option. The Widget Catalog window is displayed.
  7. Search for PLM in the search bar.
  8. Add the required widget.
  9. Click Save. The widget is displayed in the insights panel.
  10. Click the ellipses.
  11. Click the Context messages option. The Context Messages window is displayed
  12. Select the required widget.
  13. Click Edit.
  14. Click the Add context message option. The Context Messages window is displayed.
  15. Specify the type of context message. Possible values:
    • Infor Business Context
    • Custom name
  16. Click OK. The Context Messages window is displayed.
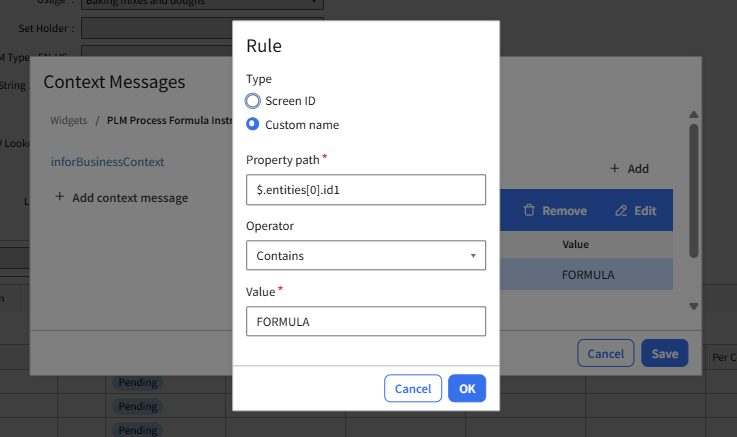
  17. Click Add. The Rule window is displayed.
  18. Specify the Type of rule. Possible values:
    • Screen ID
    • Custom name
  19. Select the Property path.
    Note: 
    • If you select Screen ID, this value cannot be modified.
    • If you select Custom name, this value can be modified.
  20. Specify the Operator. Possible values:
    Note: 
    • Equals
    • Starts with
    • Ends with
    • Contains
    • Match
  21. Specify the Value for the selected rule type. For example, the required widget is displayed in the widget catalog if the id1 value in the Context Viewer is FORMULA.
  22. Click OK.
  23. Click Save. The context message configuration is saved.
    Note: If you select Custom name, the Property path must reference a business context attribute configured in the Business Context Mapping window.