Role-based templates for the web client
Using the Configure Templates page, the Optiva administrator can customize the page layouts for the web client. The page layouts can be different for each role. Within each role, the page layouts can be different for each symbol and object class.
For example, the page layouts for the
Raw Material item class can be different for the
RL_ADMIN role and the
IE_ADMIN role. Additionally, the page layouts for the
Raw Material item class can be different from the page
layouts for the
Finished Good item class.
The default configuration for the web client pages is specified in the
@DFLT role-based template. Initially, the other
role-based templates inherit the
@DFLT role-based template configuration.
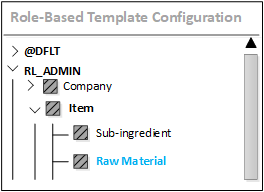
What happens when the administrator changes the configuration for a
role-based template? The name of the role, the symbol and the object class within that
role, are highlighted in bold. In this example, the configuration for the Raw Material item has changed for the RL_ADMIN role.
In the Configure Template page, the administrator can complete these tasks for each role:
- Specify the columns and captions that are shown on the Main tab, Security tab and Tables tab for the object class. The columns can be marked as read-only, too. The Tables tabs are created by the administrator.
- Specify the tabs that are displayed to the user. By default, all of the tabs are shown. Tabs can be marked as read-only, too.
- Restrict the function codes that are shown for notes, attachments, and embedded images.
- Specify the tree references that are shown to the user.
- Revert all changes that are made to any role and class. This is accomplished by clicking the button.
Any changes to the role-based templates are stored in the
FsWebConfig tables in the database.