Adding Outlook emails to interactions
In SyteLine, interactions are used to keep track of information about any encounters with a customer, vendor, prospect, or sales contact; for example, emails, phone calls, and faxes.
You can add incoming and outgoing Outlook emails to the SyteLine Customer Interactions, Vendor Interactions, Prospect Interactions, and Sales Contact Interactions forms. When you open a received or sent email, the SyteLine add-in form is displayed below the reading pane when you open the message in Outlook.
The next several steps detail how to add a message to the SyteLine Customer Interactions form. This is an example that can be used to understand how you can also add a message to the Vendor Interactions, Prospect Interactions, and Sales Contact Interactions forms.
You can attach the message to an existing interaction, or create a new interaction. To add the message to the SyteLine Customer Interactions form:
- To attach the message to an existing interaction, first select a customer, then search for an existing interaction. You can provide other details if needed. When you select a customer, the customer number, ship-to number, and customer name are displayed. The Outlook add-in locates the existing interaction using the reference number (for example, Customer, Vendor) and the email subject.
- To create a new interaction, select
Create New Interaction. The
additional fields Choose Topic and
Descriptionare displayed. If you
select a topic from the available list, the Description contains the email subject. Alternatively, you can
write your own description.. Note: In this example, the add-in tries to set a default value for the Customer field based on the sender’s email address. If the e-mail address matches either a primary contact or secondary contact email address in the SyteLine Customers form, then the matching customer name is placed in this field.
When you are sending an email, the add-in tries to provide a default value by matching the first address on the To line with a primary or secondary contact email address in the SyteLine Customers form. If no match is found, the add-in looks through the Customer contact table. If multiple matches are found, the add-in will pick the first record. An asterik(*) will suffix the customer label to indicate that there are multiple matches.
-
Click
. You will see a
prompt confirming that the message was attached to the interaction.
The resulting attachment in the SyteLine Customer Interactions form looks like this:
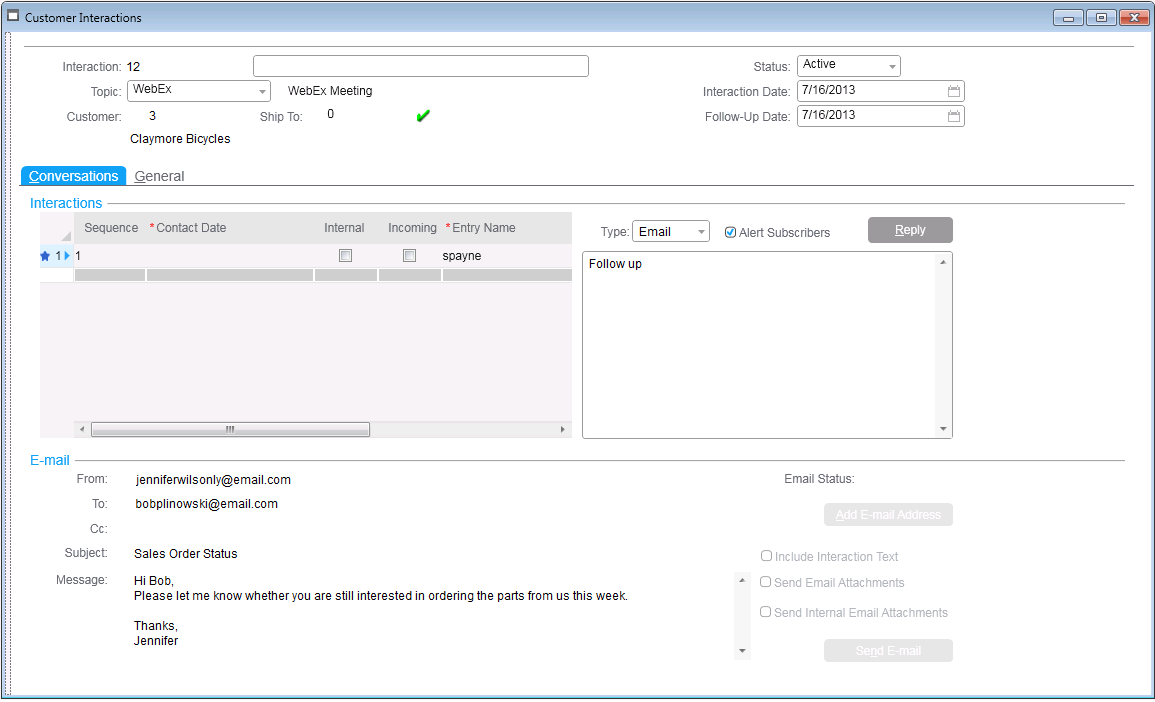
These fields from the Outlook email are included in the interaction:Outlook field SyteLine field Incoming email or Sent item Incoming (selected for incoming email; not selected for sent item) N/A Type (Email) Create date/time (sent email) Contact date/time From From To To Cc Cc Follow Up Follow-Up Date Subject Subject (80 characters) Message Message Customer (from add-in form) Customer Ship-To (from add-in form) Ship-To Contact Id (retrieved from email id match) Contact Id Salesperson Salesperson If the Outlook email is formatted using HTML, or if it contains special characters or formatting, the formatting may not be compatible with SyteLine note formatting. In that case, the special formatting is ignored, and additional spacing may appear in the interaction record.