Adding common users
-
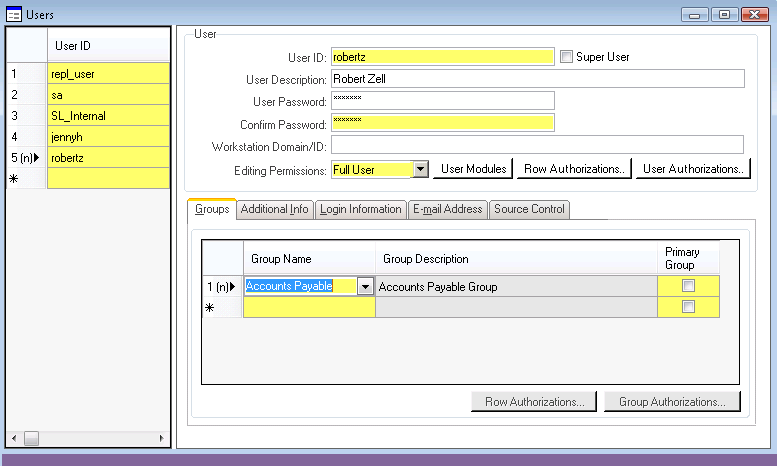
In the Users form, set up
other common users who will be working in multiple sites. You can also set up
local users now, if you want.
In on-premise environments, these users are in addition to the system administrator and SL_internal users (and the repl_user, if set up in Setting up replication at sites), which have full access to the local site or entity.
In cloud environments, these users are in addition to the system administrator users, which have full access to the local site.
If the user_local_mst table is not shared in the Intranet Shared User Tables form, then you must update the multi-site group and other user fields at each site where the user record exists, even for sites in the same database. If the AccountAuthorizations and UserGroupMap tables are not shared, then you must update authorizations and groups at each site.
- You must specify a default authorization
group for each user.
- For entity users, the authorization group should be Entity Forms. This will prevent users from doing anything in the entity that is not supposed to be done in an entity.
- For site users, select an authorization group. For now, select one or more of the default authorization groups. On the Users form, select one or more authorization groups for each user from the drop-down list. (Later, after you become more familiar with the system, you may want to set up new groups that more closely resemble your needs. Do not change the default groups!)
- To find out which forms are included in each default authorization group, go to the Groups form. Select a group and then click to list the forms that members of this group can access.
- If you do not set up at least one authorization group for a user, then the user has access to no forms, unless the user is set up with super user access.
- You must specify a default multi-site group for each user. This is the default value that appears in the Multi-Site Group field when this user opens the Item Availability form.
- Select a user who will have General Ledger administration duties. Add the Enter Out of Date Range group authorization for that user. This authorization is used to correct journal entries that were incorrectly created in the wrong accounting period
- For mobile users, specify a Mobile Default Form on the Login Information tab. See the help topic on setting up SyteLine mobile access for more information.
- On-premise deployments only: For developer users, if you are using a source control system, specify the user’s login information for the source control system.
- On-premise deployments only: If you have sites in multiple
databases and you are not sharing user tables, you cannot replicate the
usernames or groupnames tables because those tables use identity
columns. However, to simplify the initial setup of multi-site users, you
could add the multi-site users and groups in one site, export the data
to Excel spreadsheets, and import into sites in other databases. See
Data load to and from spreadsheets.
For sites in separate application databases, the user password, email addresses, and workstation login can be set up in one site and replicated to the rest.
This is handled through the UserNamesRemoteUpdateSp in the Site Admin category.
However, the user record, assigned user module, authorization group and other required fields must already be set up at the individual sites.
- If you have multiple sites or entities in one application database, any data stored in the non-multi-site tables is shared across all of the sites and entities. This data includes the user ID, password, and email addresses, as well as some other fields. However, certain other fields such as multi-site group must be set up at each site and entity, if those other fields are in tables that are not being shared.
- A warehouse (Whse) may be specified here but is not defined yet. You can return to this form later to select the appropriate warehouse.
- You can optionally select a time zone to display the
current time based on the user's time zone. This field is ignored unless
the DateTime in Client
Time Zone process default is enabled. If the process
default is enabled and this field is blank, the value defaults to the
time zone of either the local user’s machine or the web server. If the
process default is enabled, we recommend that the local time zone be
specified for each user and not be left blank.Caution:The local time zone field and the associated process default should not be used with SyteLine at this time.
- You must specify a default authorization
group for each user.
-
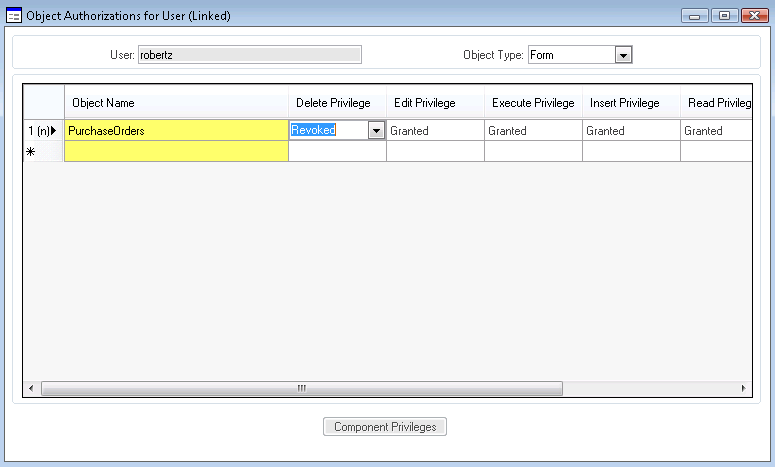
From the Users form, click
to display the Object
Authorizations for User form, where you set up object
authorizations for each new user record. Settings made here override any group
authorizations for this user.
Some of your users might require special access to certain forms that is not covered in the default group authorizations.
For example, the user robertz is in the Purchasing authorization group, which has full access to the Purchase Orders form. However, you do not want to allow robertz to delete POs.
-
On-premise deployments only: If you decided
during the planning phase to use named user licensing, return to the Users form and select a user record. Click
to
go to the User Modules form where you can
set up licensing for the selected user. Repeat this step for each user in the
site. Use the Licensing spreadsheet from your planning phase to help with this.
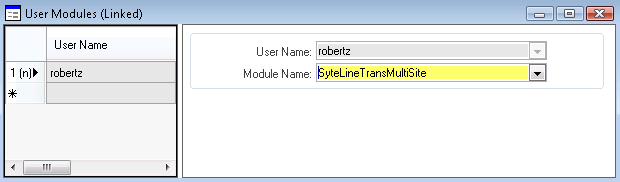
If you are using Intranet Licensing, the User Modules form is available only at the master site and not at the participating sites.
See the Infor SyteLine Licensing Administration Guide for more information about how licensing works.