Adding a new site or entity to an existing system (one site per database)
To add a new site or entity with no existing data to an existing multi-site system with a master site and shared tables intranet, follow these steps. See the relevant chapters earlier in this guide for additional details about any step.
- Create the additional site or entity database as described in the topic "Creating additional databases." Do not link the database.
- On the utility server, use the Configuration Manager to set up a client configuration for the new site (named IN using our example), using the steps under Creating additional client configurations.
- Apply the same patches to the new database that have been applied to the other databases in the shared intranet.
- If you have UETs defined at other sites in the shared intranet, ensure that the same UET schema changes are made in the new site.
- Use the Trigger Management form to regenerate triggers for all tables in the new site.
- Follow the other steps in the chapter about Setting Up Configurations and Services to perform these tasks:
- Sset up any new web servers or configuration groups needed for the new configuration.
- Use the Service Configuration Manager to add event monitoring for the new configuration, if needed.
- Use the Service Configuration Manager to add TaskMan monitoring for the new configuration.
- Stop and restart the Infor services so they are aware of the new configuration.
- Log into the new site (IN), using the SQL sa user name and password.
- In the new site, set the domestic currency on the Multi-Site Parameters form.
- In the new site (IN), open the License Management form and apply the license. (If you are using Intranet Licensing for your shared intranet, skip this step.)
- In the new site (IN), open the Sites/Entities form and look at the existing record for this site (IN). The record should include the time zone, an intranet name (probably Demo if this is a new site), a database name, and a forms database name.
-
In the new site (IN), in the
Sites/Entities form, add site records for all
sites that already exist on the shared intranet. In our example, you would add
records for OH, MI, and CA.
Note: In the records for the other sites, only specify a Time Zone. Any information in these records will be overwritten later, when you run manual replication. See the information about manual replication in Adding a site or entity to an existing shared tables intranet.
- In the master site (OH in our example), open the Sites/Entities form and add a site record for the new site (IN). In this record, specify exactly the same information (Time Zone, Intranet Name, Database Name, etc.) that is displayed in the IN record at the IN site.
-
In the master site (OH), in the
Sites/Entities form, add Link Info for each
site. For example, the Link Info for the master (OH) site record looks like
this:
-
In the master site (OH in our example), open the Sites/Entities form and add a site record for the new site (IN). In this record, specify exactly the same information (Time Zone, Intranet Name, Database Name, etc.) that is displayed in the IN record at the IN site.
-
In the master site (OH), in the Sites/Entities form, add Link Info for each site. For example, the Link Info for the master (OH) site record looks like this:
To Site
Linked Server Name
CA
usserver1\slutil
IN
usserver2\slutil
MI
usserver1\slutil
The Link Info for the CA site record looks like this:
To Site
Linked Server Name
IN
usserver2\slutil
OH
usserver1\slutil
MI
usserver1\slutil
The Link Info for the MI site record looks like this:
To Site
Linked Server Name
CA
usserver1\slutil
IN
usserver2\slutil
OH
usserver1\slutil
The Link Info for the new site record (IN) looks like this:
To Site
Linked Server Name
CA
usserver1\slutil
MI
usserver1\slutil
OH
usserver1\slutil
Note: Do not manually update the site records at any of the other existing sites on the intranet. -
-
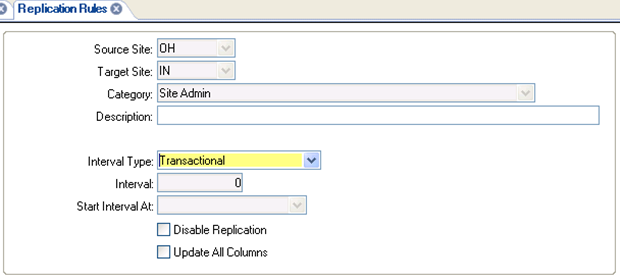
In the master site (OH), add a replication rule to send Site Admin
data to the new site (IN).
- In the master site (OH), open the Replication Management form and regenerate replication triggers.
-
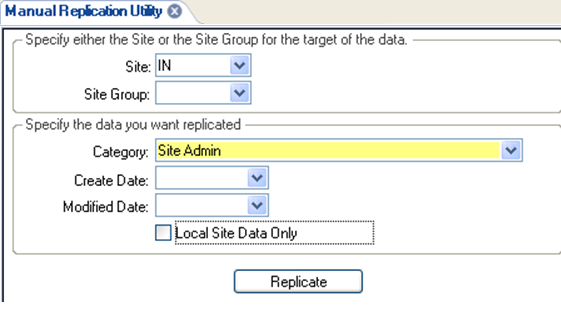
In the master site (OH), open the
Manual Replication Utility and send all Site
Admin data from the master site (OH) to the new site (IN). Clear the
Local Site Data Only
field.
- In the new site (IN), open the Sites/Entities form and verify that the site records for the other sites (OH, MI, and CA) were updated.
-
In the new site (IN), open the
Intranet Shared Tables form and verify that
tables that are shared in the other sites now appear to be shared in this site.
Note: Although the tables appear to be shared, they are not actually shared until after you complete step 18.
-
In the new site (IN), open the Sites/Entities form and change the
Intranet Name to the
shared intranet’s name.
After you select the intranet, you will see this message:
At least one Intranet Shared Table where Shared is Yes exists for Intranet that has [Intranet: name]. Processing may require a significant amount of time.
Click OK and save the record.
During the process, several Replication Triggers Regenerated messages are displayed.
- Use the View Management and Trigger Management forms at each site and entity to regenerate the views and table triggers.
-
In the database server for the new site (IN), verify that the
shared _all views have been created and the shared _all tables no longer exist:
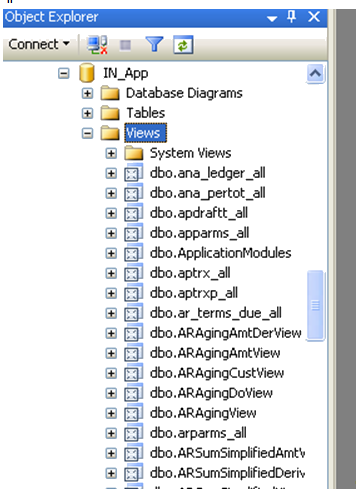
Note: Depending on your setup, some _all tables might be shared, and others might not be shared. In that case, you will still see some _all tables in the Tables node, but the shared _all tables should not be listed. - At this point, you can set up other replication rules in the new site (IN) to/from other sites in the intranet. See Setting up replication at sites.
- Regenerate the replication triggers after adding the rules.
-
At the new site or entity, follow the steps in
Setting up accounts and financial reporting hierarchies
to set up the site’s accounting and reporting information:
-
For new sites that report to an existing entity, the chart of accounts and accounting periods should be automatically replicated. In order for this to occur, these conditions must be met:
- The hierarchy between the site and entity must be set up as described in Setting up accounts and financial reporting hierarchies.
- The Ledger Consolidation rule must be set from the entity to the site, and the GL Replication rule must be set from the site to the entity, and replication triggers must be regenerated.
- Manual replication of Ledger Consolidation from the entity to the site, and manual replication of General Ledger from the site to the entity, must be processed.
- For new entities, the chart of accounts and accounting periods must be copied manually as described in Setting up accounts and financial reporting hierarchies.
- If some existing sites will report to a new entity, use the Change Reports To Entity utility at those sites to specify the new reporting hierarchy. Do this after performing all of the other steps in Setting up accounts and financial reporting hierarchies and - if there are now multiple levels of entities - after specifying the CTA account information at the corporate (top-level) entity as described in Setting general parameters.
-
-
Follow the steps in Chapters 8-12 to finish setting up the new
site or entity. You will probably be copying much of the data from existing
sites.
-
On the Inter-Site Parameters form, if appropriate, set up relationships between the new site and the other existing sites that will be transferring items or material to/from the new site. If Site Admin is being replicated, this information will be added automatically at the other sites.
-
On the Order Entry Parameters form, set the invoice length to match the length set at the other sites.
-