Setting system parameters

  1. At all sites that will transfer items or material to other sites, use the Inter-Site Parameters form to establish the relationship between sites and to identify the inter-company account numbers to use during transactions. See the help topic about moving items or materials between sites.


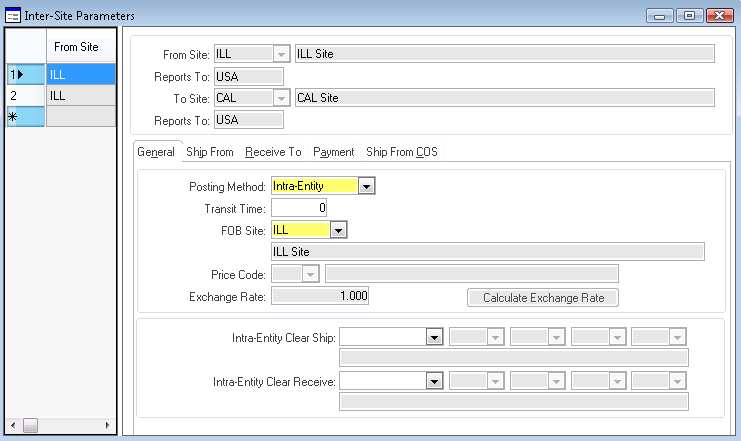
    • This form must be completed before any multi-site activities take place. Specify the information in one site, and then most of the information in the records is added automatically at other sites where Site Admin is being replicated.
    • Specify this information:
      • Posting Method: Although your choice here is "intra-entity" or "inter-entity," this setting really has little to do with entities. It determines how accounting transactions between the sites are handled. Think of "intra-entity" as "at cost" and "inter-entity" as "with revenue."
      • Price Code: This code can be selected here but it is not defined yet. Return to this form and select a price code later. The price code is only used when the Posting Method is inter-entity.
      • Exchange Rate: The exchange rate is only used when the To Site and the From Site have different base currencies.
      • If the Posting Method is intra-entity, specify accounts.
    • The information regarding Ship From, Ship From COS, and Receive To is used only when the Posting Method is inter-entity.
    • The information regarding Payments is used only for A/P and A/R payments.
  2. At the sites, set up Accounts Receivable Parameters:
    • You must specify a multi-site group on this form. Only records for sites in this group are considered when performing Accounts Receivable payments and quick invoice payments, and when consolidating A/R posted transactions.
    • You can set up a customer prefix that indicates the originating site as well as the type of record. For example, you can use CI as the prefix for customer numbers local to the ILL site and CC for customers local to the CAL site. If you have global customers, you could have one site that can create only global customers, and use the prefix CG in that site. For more information about prefixes, see the Infor SyteLine Multi-Site Planning Guide.
    • A credit hold reason code can be specified here but is not defined yet. You can return to this form later to select the appropriate code.

  3. At the sites, set up Accounts Payable Parameters:
    • You must specify a multi-site group on this form. Only records for sites in this group are considered when performing Accounts Payable payments and quick voucher payments, and when consolidating A/P posted transactions.
    • You can set up a vendor prefix that indicates the originating site as well as the type of record. For example, you could use the prefix VI for vendors local to the ILL site and VC for vendors local to the CAL site. If you have global vendors, you could set up one site that can create only global vendors, and use the prefix VG in that site. See the Infor SyteLine Multi-Site Planning Guide for more information about using prefixes.
  4. At the sites, set up Order Entry Parameters:
    • Specify the invoice number length in the Invoice Length field. We recommend that you set this field to 12, which is the maximum.
      Caution: 
      The invoice number length must be the same for all sites in the system. It must be set at each site; it cannot be replicated to the other sites. When you enter a value here, the system verifies it against the Invoice Length value set for other sites, if the other sites are replicating at least one category containing the coparms_all table with this site. After the Invoice Length field is set to a non-null value, the value can never be updated. When you save the change, the system updates about 50 database tables, so it may take a long time to process.
    • If you plan to use delivery orders, specify the DO/BOL length.
    • Site-specific prefixes are recommended if Centralized Order Entry, Invoice Builder, or Accounts Receivable payments across sites will be performed. See the information on prefixes in the Infor SyteLine Multi-Site Planning Guide.
    • If you will use DIFOT (Delivered In Full and On Time) as a standard to measure delivery performance in your supply chain, provide tolerances.
    • If the Price From Originating Site field is selected, default item prices for CO lines are pulled from the site originating the order. This allows you to maintain pricing in one centralized site. Otherwise, the system pulls the default prices from the site that ships the order line item.
      Caution: 
      After you update the Invoice Length and/or DO/BOL Length and save the record, log yourself and all other users out of SyteLine. This resets the session variables. Then log back in.
    • When you save this record, you might see a message that asks you to perform manual replication of A/R data. If so, go to the Manual Replication Utility, select the A/R category, and select the site(s) to which A/R data is being replicated. This ensures that the required data is in the proper tables at the other sites.
  5. At the sites, set up Purchasing Parameters.

    Site-specific prefixes are recommended if Accounts Payable payments across sites will be performed. See the information about prefixes in the Infor SyteLine Multi-Site Planning Guide.

  6. At the sites, set up Transfer Order Parameters.

    Site-specific prefixes are recommended to make it easier to determine which site initiates a transfer order. See the information about prefixes in the Infor SyteLine Multi-Site Planning Guide.

  7. At the sites, if you will use MRP or APS, set up the information in the Planning Parameters form.

    See the online help and the Infor SyteLine APS Configuration Guide for information about how to set up these parameters for use in a multi-site environment.

  8. At the sites, set up Inventory Parameters to determine how SyteLine handles inventory at each site.
    You can choose to track the cost of items at the warehouse level rather than at the item level (that is, for the entire site). See the help to determine the consequences of this selection.
  9. At the sites, go to the Master Explorer > Modules > Codes > Parameters and open the other parameters forms that you have not yet accessed, to set up parameters appropriate for your system.
    • Depending on your system, you might not need to set up some of these parameters.
    • Some forms might require selection of data that is not yet set up. If so, return to finish the setup of those forms later.
    • When a prefix field appears on a parameter form, you might want to specify a site-specific prefix where appropriate, as described for the other parameter forms above.
  10. After you update all parameters, log out of each site or entity and then log in again. This updates system variables so that they contain the latest parameter information.