You can use the Engineering Workbench to add a routing
and bill of material to inventory items (the current routing), production
schedules, jobs, or estimate jobs. If you're using the Molding Pack, you
can also add a routing and bill of material to co-product jobs or co-jobs.
-
To select the transaction:
-
In the View field, select the
type of routing/BOM to work with.
-
Click the filter button in the toolbar.
-
Use the header fields to select the item, job, or production
schedule to which you want to add routing/BOM information.
-
Click the filter button again. Any existing routing information
for the item, job, or schedule is displayed.
-
To create the routing:
-
In the Operations grid, add a new record for each new operation
in the routing. Use the grid fields to select a work center and
define operation setup, queue, and run times, as well as the start
and end date and other information about the operation.
-
After adding all the operations for the routing, select .
-
If you need to define resources for an operation beyond the
default resource group defined for that operation's work center:
- Right-click on the operation number in the Operations grid
and click Details. The appropriate
Operations form opens, with the record for this operation
displayed.
- In that form, select the Resources
tab and define the crew or machine resource groups that this
operation requires in order to be processed, as well as parameters
related to the resource groups.
- Save the record and close the form.
-
If you need to define costs for an operation:
- Right-click on the operation number in the Operations grid
and click Details. The appropriate
Operations form opens, with the record for this operation
displayed.
- In that form, select the Costs
tab and define the values used in costing this operation.
- Save the record and close the form.
-
To add materials:
The Engineering Workbench record containing
a new operation must be saved before you can add materials for the
operation.
-
In the Materials grid, add a new record. Select an operation
for which you want to define a material. Then select or enter
the rest of the information about the material. You can add multiple
lines defining different materials for a single operation.
-
Once you have added all the materials for the operations you
defined, select to
save the new materials.
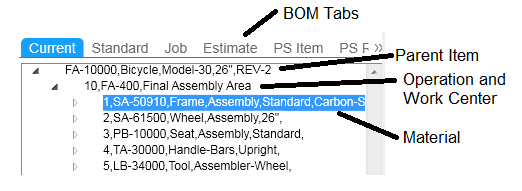
You can now viewing the new routing/materials in the left tree pane
of the Engineering Workbench form. The pane
contains a tab for each of the available routing/Bills of Material.
To see the new operations or materials you added, either close and reopen
the Engineering Workbench form, or click
the filter button on the left pane and click OK
in the dialog that appears. Either method refreshes the tree pane.
The tree display is shown here:

You can collapse the tree display into a simpler view
by selecting the (-) symbol next to each item or operation. For example,
suppose you want to look at operations for the item, without displaying
the materials. Click the (-) symbol next to the operation, and the materials
disappear in the collapsed tree. The word "Alternate" appears
next to any material that is specified as an alternate material on a current
operation.
Note: You cannot
add or remove operations or items from routing/BOMs in the left pane.
Use the right pane of the Engineering Workbench
form for maintaining routing/BOMs.
