Example: Setting Up a Bill of Material with Alternate Materials
Suppose you have a BOM that looks like this:
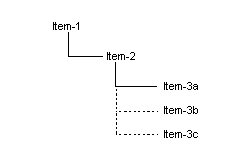
In this BOM, Item-3a is the primary material of an "Alternate Group." Item-3b and Item-3c are alternates for Item-3a. Any one of the three materials can be used to make Item-2. To set up this type of BOM in the system, follow these steps.
- Before you start defining the BOM in the system, plan it on paper and decide what material will be the primary and what materials will be the alternates.
- Create an operation for your parent item on the Current Operations form and save it. For example, in the graphic above, this operation would be for assembling Item-2.
Items with the Configuration Flag selected on the Items form cannot have alternate materials.
- Click the Materials button to open the Current Materials form.
- Select Actions > New.
-
In the
Material field, select an
item number to add as the primary material in this alternate group. For
example, in the graphic above, this material would be Item-3a. Materials in an
alternate group must be defined on the Items form (they must be inventoried
items).
Notice the Alt Group Rank is automatically set to 0; this value identifies this item as the primary material for this alternate group. The system plans alternate materials in sequence of Alt Group Rank, and will always attempt to plan the primary material first. You cannot change this rank value after you save the record, so make sure this is the item you want as the primary item.
Also notice the Alt Group field contains the number 1. In the next steps, we will set the Alt Group to 1 for each material we add to the operation to make them all members of the same alternate group.
- Enter the appropriate information in the remaining fields to complete the definition of this material and then select Actions > Save to save the record.
- Select Actions > New to add the next material record. This time, when you select an item number in the Material field, notice the Alt Group field contains the number 2 (the Alt Group field defaults to the number in the material's Seq field).
-
You want this material to be an alternate for the previous
material you added, so change the
Alt Group to
1.
You cannot change a material's Alt Group after you save the record (however, you can delete it and then re-add it with a different group ID if necessary).
- Complete and save the material record.
- Select Actions > New.
- Select an item number in the Material field to represent the final alternate material for this operation.
- The Alt Group defaults to 3; change it to 1.
- Complete and save the material record.
-
At this point, the three materials you added in the above steps
are members of Alt Group 1, and any one can be used by the operation to which
you added the materials. The primary material has an Alt Group Rank of 0, the
second material you added has a rank of 1, and the third has a rank of 2. This
ascending rank determines the sequence in which the system chooses an alternate
material to plan. You can change the rank of each alternate material using the
Ranks for Alternate Materials form. Follow these
steps:
- On the Current Materials form, select the material record for the primary material from the grid on the left side.
- Click Ranks. The Ranks for Alternate Material form opens.
- Select the record for the alternate material you want to re-rank and click the Up or Down button. For example, if you want to move the rank 1 material to rank 2, select the rank 1 material and click Down. The next-highest-ranking material moves up to the position of the material for which you changed the rank.
- Select Actions > Save to save the changes.
Note: If you delete an item record that is a member of an alternate group, the materials that are lower in the rank structure for that group move up in rank accordingly. You cannot delete an item record if it is the primary material in an alternate group.