Using the Localization file to translate user content
The localization configuration is managed in Admin > Space Management > Localization using a translation file that can be uploaded in the interface.
To translate user created content and apply this functionality:
- Create all the content in the UI (titles, text, labels etc.)
- For this step users can go about creating content as usual, no special steps are required.
- Tip: Determine your default language. The default language is the one that is used to display content, if there is no translated content available that corresponds to the user’s locale.
- All content created before the release of the User Created Content Translation feature will also be assigned to the default language.
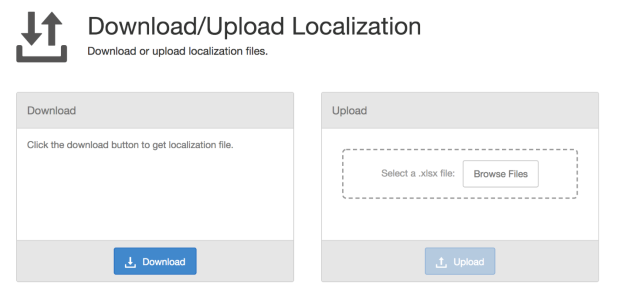
- Download the translation file. The user performing this step must have privileges to access the Admin panel.
- Navigate to Admin > Space Management. Select a space, then click Localization.
- Click Download. Save the file to your local computer by following your browser’s file download prompts/settings.
-
When the file is downloaded, the resulting file always contains all the content as of the time of the download. Birst does provide mechanisms to guarantee that no changes are made the content after the file is downloaded. The user performing the download (and the subsequent upload) must ensure that the latest file is being used for translation.
-
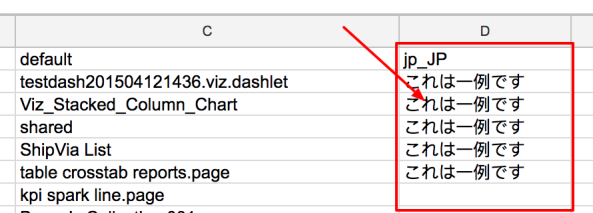
Update the localization file with the text in the desired languages. Each row in the table corresponds to a single piece of translatable content in Birst. Each row has seven columns by default:
- Category: The category of the content element.
- Subcategory: The subcategory of the content element.
- Property: The property name of the content element.
- PathName:The path of the content.
- path: The location of the content element.
- id: The unique identifier of the element
- default: The text that is displayed for the element when a translated version is not used.
Note: This step takes place outside of the Birst system. It is performed by editing the localization file. The localization file is an MS Office Excel file with .xlsx extension, which corresponds to Excel versions 2007 or later. The default file name is ‘localization.xlsx’. The localization file is not required to have any specific name if the extension is .xlsx and the data in the file follows the required schema.
Tip: When the file is downloaded and edited the first time be aware that:
-
All translation is contained on a single worksheet (table)
-
The columns in the table are not required to be in a specific order
-
The localization takes place by adding a separate column for each locale (language) in the table. The first row (header) contains the locale designation in an ‘xx_xx’ format, where ‘xx_xx’ has to correspond to one of the locales supported by Birst.
- Save the file locally, then import your localization file on the Localization page in Birst:
- Select Browse Files to locate your file.
- Click Upload.
- Birst displays a message confirming when the upload has completed successfully. After the updated localization file is uploaded, users can see the content in the language that corresponds to their locale.