Enabling IDM-Birst integration in Infor-OS
To use Infor Document Management (IDM) with Birst as a central document repository solution to securely store the attachments sent via Birst notifications, it must be enabled with Infor OS.
Adding Birst MIME Types in IDM
From the Infor Document Management Control Center, users with Administrator privileges can create, edit, and view MIME types. Access the Document Center by selecting the Document Management widget and then selecting the Control Center icon. 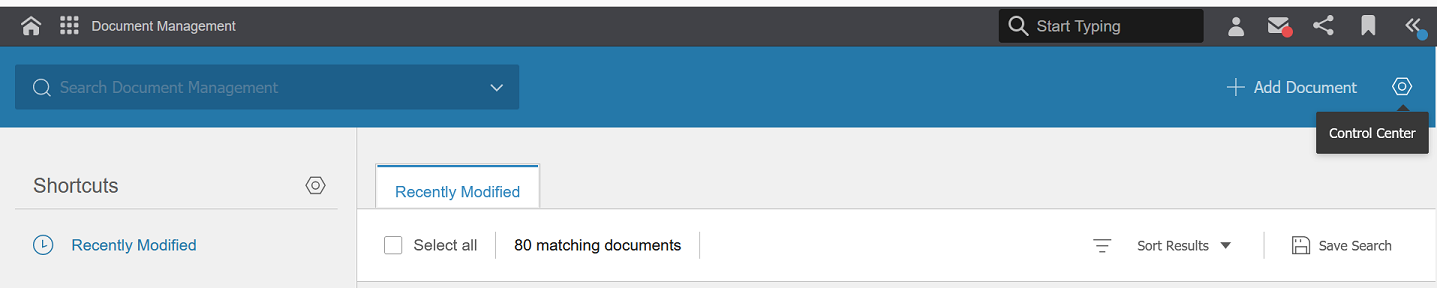
- Under Configuration, click on MIME types and then + Add.
- Add the following types:
Name Extension Value
Designer adhocreport text/xml Gzip gz application/gz
Enabling Birst-IDM Widget
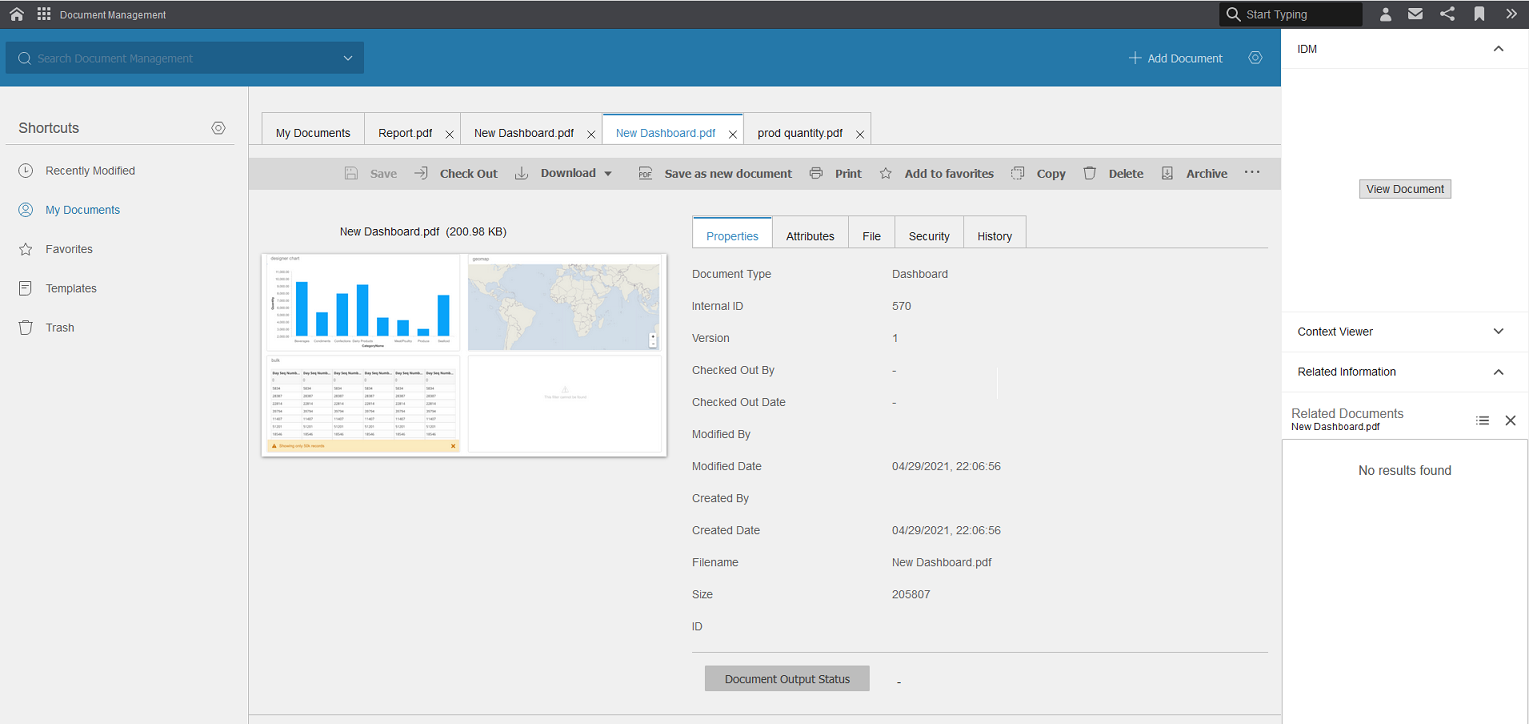
The IDM-Birst Widget allows users to navigate from an offline document in IDM to a Birst Dashboard or Report. From there, users can apply filters and view up-to-date information.
- Configure the Birst Application.
- Click on Admin Settings > Manage Applications and open the Birst Application.
- Under the Deployment Information tab, ensure that the Logical ID for the Birst application is lid://infor.birst.birst. This parameter is used to open the correct Birst application.

- Click the Customer Parameters tab.
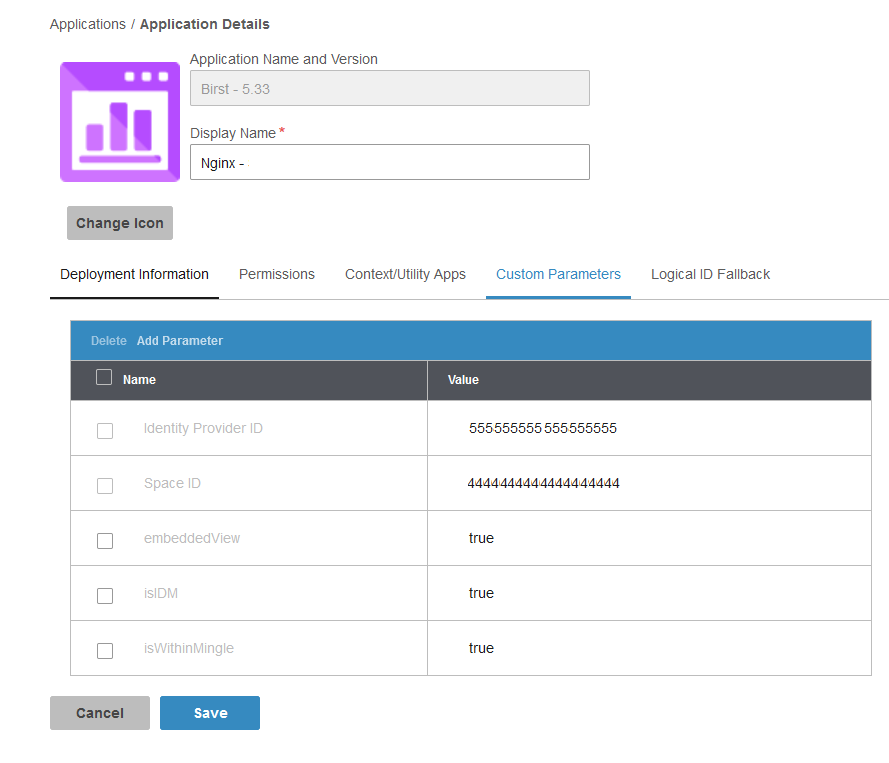
- Add the following parameters:
- Identity Provider ID: The Service Provider Entity ID as dispalyed in the SAML configuration in Birst.
- Space ID: The Space Id for the space used to generate the reports. This can be found under your Space Properties in Birst.
- embeddedView: true
- isIDM: true
- isWithinMingle:true
- Save the settings.
- Create a new Widget.
- On the side bar navigation click on Manage Context / Utility Apps.
- Add a new option by clicking on the Context/Utility App.
- The application details should be as follows:
- Name: IDM
- Type: Context App
- Description: Infor Document Management
- URL: Add the SAML URL. The URL must contain include spaceID, embeddedView:true, isIDM:True, and isWithinMingle: true.
- An example SAML URL looks like:
https://host(birst)/SAMLSSO/Services.aspx?birst.idpid=55555a5-555-55ab-5a55-555b555c55de&birst.spaceId=ab44444a-44b4-44a44b444444c44b4b44&birst.module=visualizer&birst.embedded=true&embeddedView=true&birst.reuseSession= true&isWithinMingle=true&isIDM=true
- An example SAML URL looks like:
- Click on the Context Message link from the bottom menu.
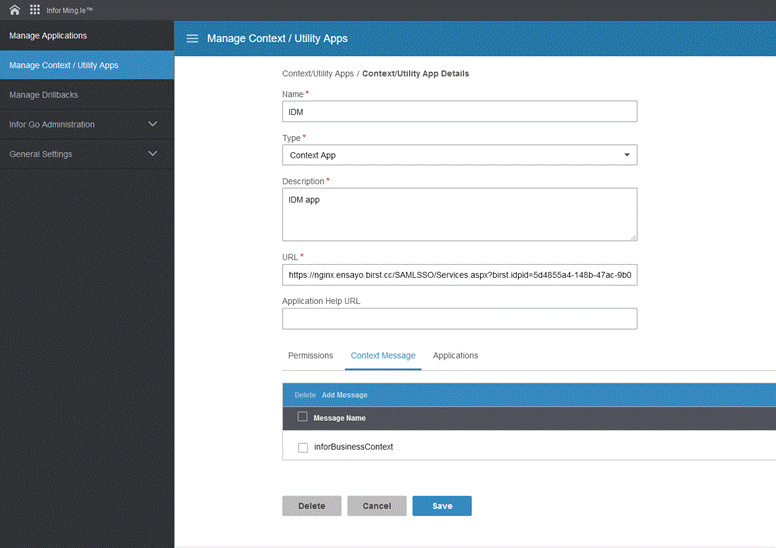
- Select Add Message.
- Select inforBusinessContext.
- Save the application.
- Click on the Applications link from the bottom menu.
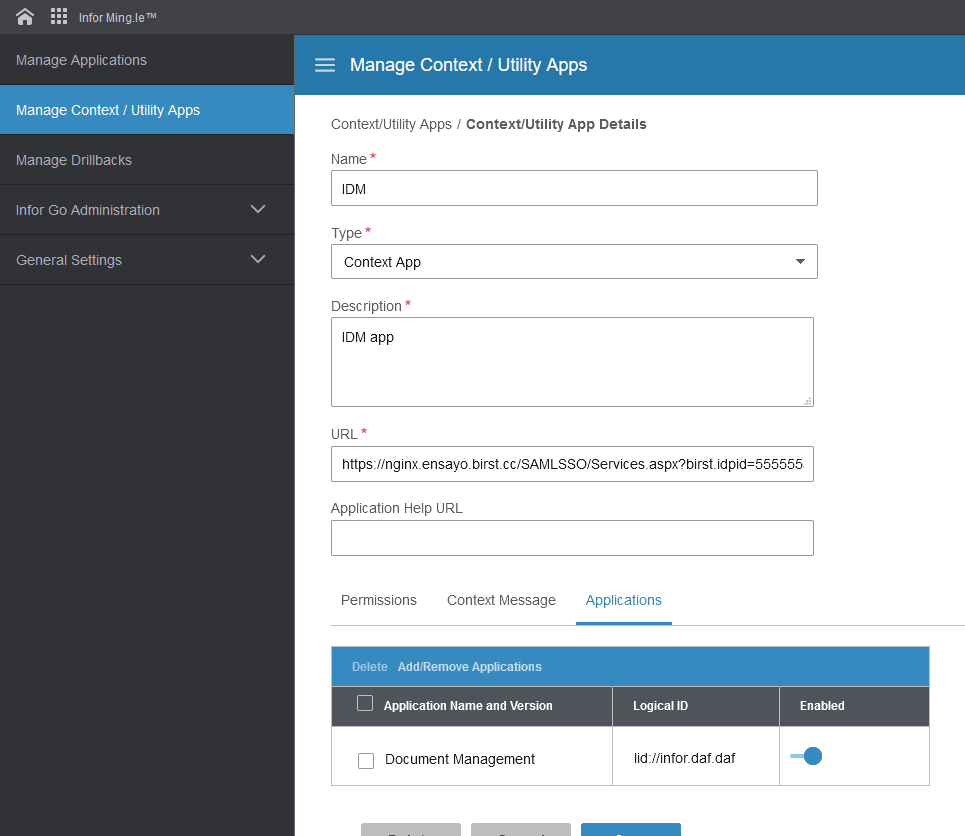
- Select Add/Remove Applications.
- Add Document Management.
- Save the application.
- Configure the IDM Application.
- Open the Infor Document Management App by clicking on Manage Application and opening IDM.

- Click on the Add/Remove Context/Utility Apps > Add Context Apps.
- Select IDM and enable it.
- Click on Edit Screen ID Associations under the IDM Context.
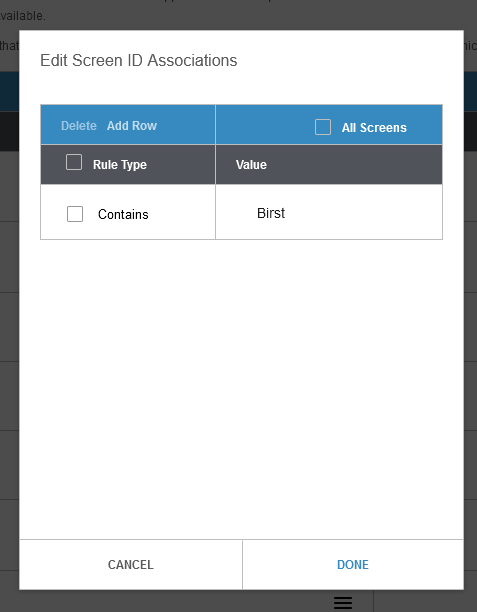
- Click on Add Row.
- Add Rule Type: Contains and Value: Birst.
- Click on Done.
- Save your settings.
- Open the Infor Document Management App by clicking on Manage Application and opening IDM.
-
After this set up is completed, the Birst Widget will be display in IDM for document types Birst_Reports and Birst_Dashboards.
Current Limitations: The widget uses the space ID defined in the Birst application with Logical ID = “lid://infor.birst.birst” to navigate to the application predefined space. If IDM documents are created from more than one space, the widget will only be able to open Birst Reports or Dashboards that are created in the same space set in the Birst application with Logical ID = “lid://infor.birst.birst.
Enable ION Notifications
If you want to send an email notification to the internal recipients when a new Birst document is created in IDM, enable ION notifications.
- Click on ION Desk App on the navigation panel.
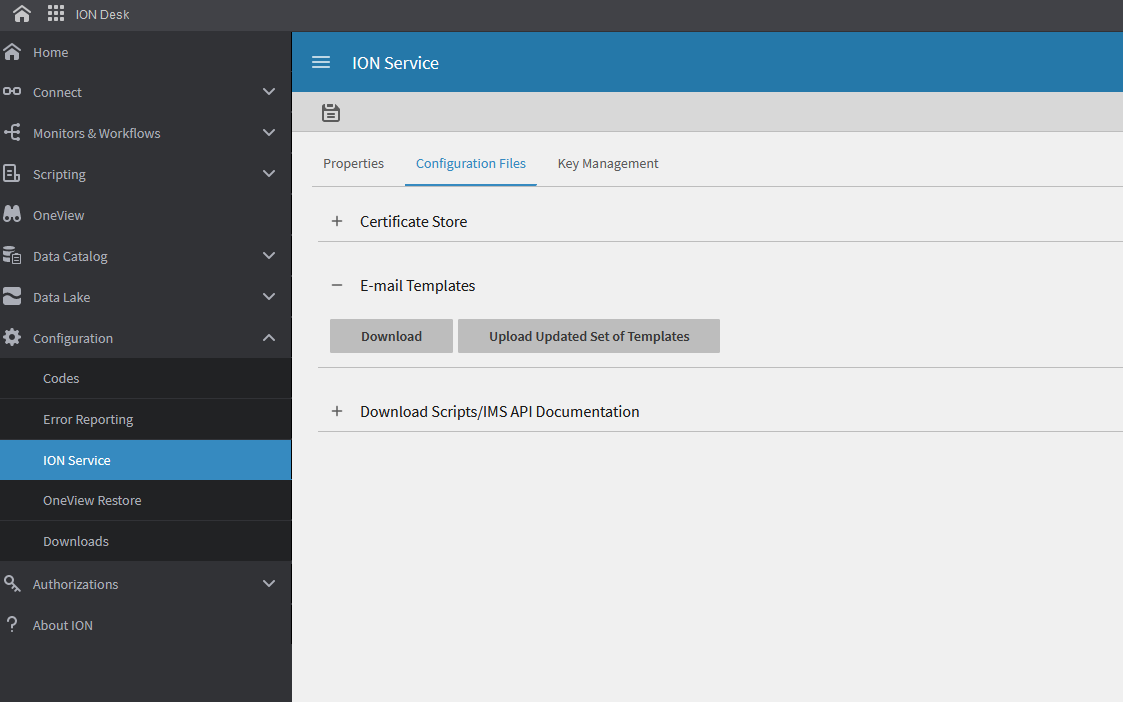
- Select Configuration > ION service.
- Open Activity engine option.

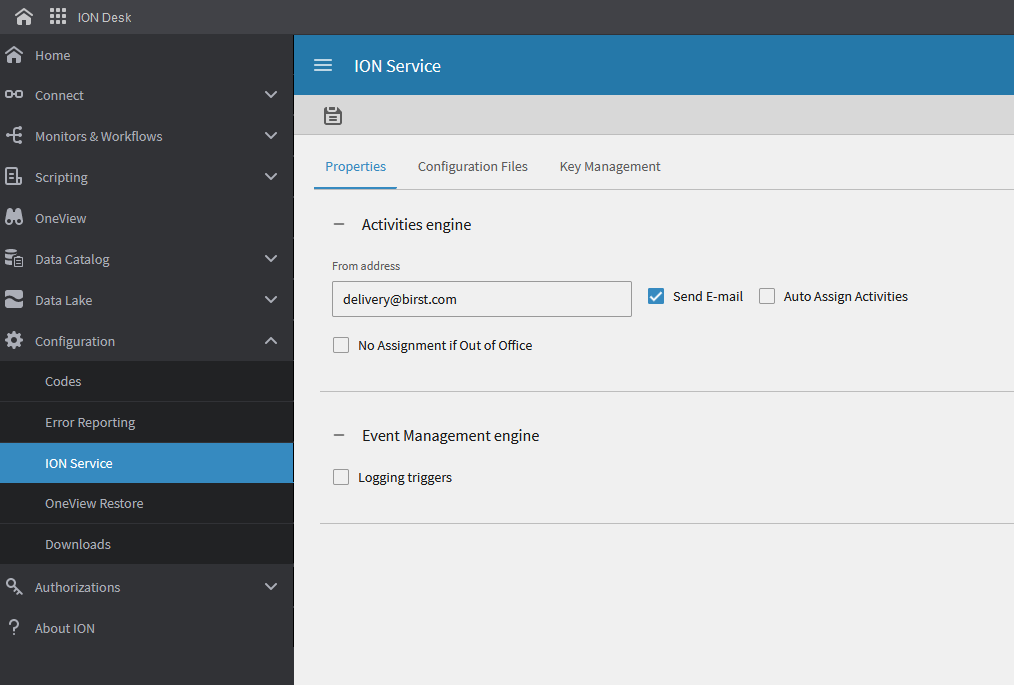
- Add the email that will send the notifications.
- Enable Send E-mail option.
-
If you would like to modify the default template, you click on the Configuration Files. Under E-mail Templates, you can change the default template by downloading the template, opening the HTML file to make your modifications, and clicking Upload Updated Set of Templates.