Creating a Bing Map with Custom Regions
You can create a Bing
map with custom regions. For example you can create a map that splits
the state of Texas into two parts: North and South.
Each custom region must be defined as a polygon. This means that the
starting point and the ending point must be the same.
Prerequisite: Google Earth (free download)
is required.
These are the high-level steps to create a Bing map with custom regions:
Creating KML Files
You need to create a KML file for each
region you want to define in the map.
To create KML files
|
1.
|
Open Google Earth. Zoom into the general area where
you’d like to create your first region. In our example we’ve zoomed in
on the state of Texas. |
|
2.
|
Using the icon tool bar above the map, click on the
Add Polygon  icon. A dialog will appear. Reposition the dialog to the side of the map.
 |
|
3.
|
To draw a region (polygon), click on the perimeter
of the region. Move the cursor to the next location on the perimeter and
click again, continuing in a circular pattern around the region. Continue
this process, clicking at small intervals to fully outline the desired
region. Each click creates a straight line from the previous click.
Tip: Polygons need to be completely closed. This
means once you fully outline the polygon you need to make sure to end
at the same location where you began. |
|
4.
|
In the New Polygon dialog, supply a name for the
polygon. The name needs to be the same name as the data value in Infor used to identify that region.
Click OK. This completes one region or polygon. |
|
5.
|
Draw a new polygon for the next region following
the same steps as above. For our example, we want to split Texas into
two regions so you would draw a new polygon for the second region. |
|
6.
|
After all polygons have been drawn, right-click the
first polygon in the navigation pane on the left. Select Save Place As…
and save the file (.KML) to your computer. Follow the same process for
each polygon created. |
Modifying a KML
File to Use in Birst
At this point you will have multiple KML files downloaded from Google
Earth. Within each file is the polygon you drew. These polygons need to
be combined into one KML file that will then be uploaded to Birst.
To combine the KML files into one file
|
7.
|
Open one of the KML files you downloaded with a text
editor. This will become the main KML file that you will load into Birst.
You can name it anything you’d like. |
|
8.
|
Keeping the main KML file open, open one of the other
KML files. Select all the text starting with <Placemark> and ending
with </Placemark>. Copy it. |
|
9.
|
In the main KML file, paste the placemark text from
the previous file under the last tag marked </Placemark>. Continue
copying and pasting into the main KML file from all the polygon files
created. For this example, there are only two files.
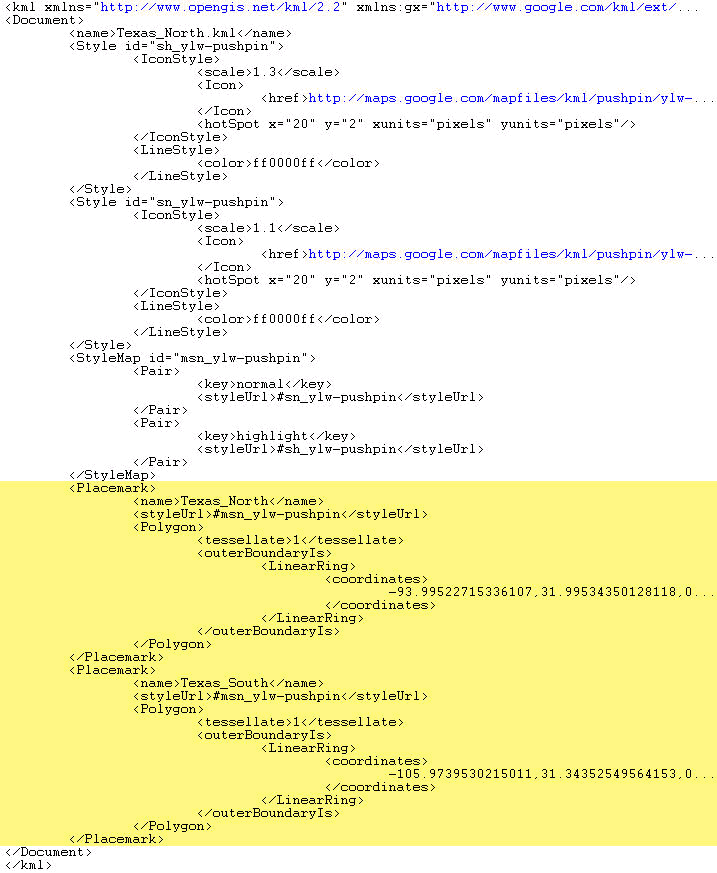
Refer to the image below which shows how the regions from both KML files
have been combined. Notice there are two “placemark” sections: one for
Texas_North and one for Texas_South. |
Creating Your Map in Birst
The last step is to upload the KML file to a space and add it to a report.
To create the map in Birst:
|
11.
|
Create
a new chart of type Bing Map, setting a Category and Series.
Important: The
values for the chart Category need to match the placemark names in the
KML file. |
|
12.
|
On the Other tab, click the Upload button to upload
the new KML file. |
|
13.
|
After the upload completes, select the file from
the Region dropdown. |
|
14.
|
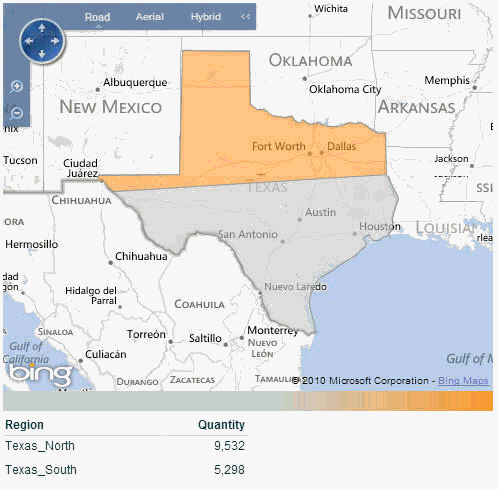
Click Apply/OK in the dialog boxes to return back
to the report. You will see your map with custom regions drawn as in the
example below.
 |
See Also
Adding an Advanced Chart Type
to a Report
Adding
Geo Markers or Bubbles on a Geo Map or Bing Map